

As part of my kitchen build, I needed a battery setup to power the fridge. If you’ve been reading my previous build posts, up to this point most of the mods have been more or less bolt-on and haven’t required much custom work. The battery system was the exact opposite and I had do a lot of research and learning…and ultimately make a few leaps of faith. Because of this, while I probably get more enjoyment from the rest of the build, this is the part that I’m most proud of.
(I totally understand this post is probably too technical for my usual readers, but I figure it could help others who are looking at doing something similar. Feel free to skim)
Through following other overlanders, I knew it was possible to have an auxiliary battery that could be charged by the Jeep’s alternator, but still isolated from the starter battery. Otherwise, I knew practically nothing. I didn’t have any understanding of volts/amps/watts/wiring/fuses. So I had a daunting task ahead of me as I started researching. It didn’t help that none of the articles/videos were using exactly the same components. Some were still talking about agm batteries, while I wanted lithium. Some only had solar charging, while I wanted alternator charging. So I pretty much had to start at ground zero: understanding volts/amps/watts, then sorting through various requirements and coming up with my own system. It was incredibly confusing when I started, and I had to be a lot more intentional about spending time reading and watching instructional videos than I usually am.
I started with defining my power requirements as that would affect the whole system. Once I knew what fridge I wanted, I made some estimations on power usage and how big a battery I would want/need. Generally speaking, the fridge is my biggest consumer. I also planned to have an inverter to be able to run a coffee grinder, power my laptop, charge various batteries. I’m also planning to eventually wire some outdoor lighting under the awning. My travel style usually involves driving at least a few hours per day, during which the battery could be charging. So typical usage wouldn’t need much battery.
In the past I’ve simply plugged a small inverter into the Jeep and charged various batteries that way…often trying to charge things while I was driving. However, it was during rain days when I did no driving at all(and would use my laptop more), that I was always just a bit nervous about whether I was running the battery too low. It didn’t help that Jeep wiring for the 12 volt plugs is not very thick, so there is quite a bit of voltage drop…and my small inverter would struggle to power the laptop. Of course I didn’t understand that at the time and thought the laptop must be a really big power draw(it’s not). All that to say, I knew the important time to calculate power requirements was for rainy days…not regular sunny ones.
I kept very detailed logs of my previous Yukon trip, so I went back looking for a worst case scenario. There was one stretch of days where it rained for a week. In that time there were two 48 hour times without driving, and the driving that I did was just 1-2 hours per day. So without idling the Jeep for charging, there would have to be a fairly big battery to keep going through all that. Luckily, when it’s rainy, it tends to be colder, so the fridge wouldn’t be using max power. That was my other concern: for camping in Canada, the fridge isn’t a huge draw, but down in the American south-west, it would be drawing a lot more power.
That brings up solar. I haven’t completely ruled out solar, but went without for now. My argument is that where I camp there tends to be enough tree cover that I often have trouble getting a good satellite signal…so I imagine I won’t get great solar either. Also, my worst case scenario is rain…and then I would get no power from it anyway. That might change if my power usage changes, but for now I think alternator charging should be enough.
So I decided on 200 amp hours of battery power, and I wanted a LiFePo battery. Originally I was thinking to do two 100 ah batteries wired in parallel, as this seemed to be a common setup. However, it seems this can have issues as batteries age…and at this point in time many manufacturers make 200 ah batteries. Now that I’ve been on several trips, I can say this amount of battery is significantly more than I need. I have a tendency to over-estimate worst case scenarios in general…so I probably could have gone with 100 ah, but I think having a ton of extra is useful, as I’m never going to have to worry about power usage, and have some room to add things.
The next major thing to figure out was the charger. Once I understood that I needed a DC-DC charger, there was the question of how many amps. Basically the more amps it can pull/push, the faster the battery will charge. However, there were questions of how much overhead the Jeep’s alternator had, as well as how thick the wires would need to be. I wasn’t successful in finding any real info on how much draw a running jeep has. And there didn’t seem to be many people writing about alternator charging setups above 30 amps on a Jeep. I think at one point I was looking at 100 amp charging, but then realized that was going to need super thick wires, and probably not supported by my alternator. So I settled on 50 amps, with the new Victron Orion XS charger…which would allow me to configure lower amps if my alternator couldn’t keep up. I could also get away with 6 AWG marine wire for the run to the engine bay. I should also mention, when I ordered this Jeep I already had this in mind, and got it with the tow package…because that comes with a 220 amp alternator vs the 180 amp one for the sport model.
So far, the charger mostly works as advertised. It can handle 50 amps, and my alternator doesn’t appear to be struggling. There has been one small issue…my Jeep has a smart alternator, that on long drives tapers the voltage as the starter battery reaches 100%. The charger can only pull max 50 amps, so as the alternator voltage drops lower than the aux voltage, it loses some output in converting to the higher voltage. Most of the time I don’t need to charge as fast as 50 amps anyway.
I also got a pure sine inverter for ac power. I went with the Victron Phoenix 12/800. It seems everyone is putting huge inverters in their setups, but maybe they have higher requirements than I do? As long as it can grind coffee, power my laptop, and charge camera/drone batteries…that’s enough for me. Generally speaking, if I can run something directly on DC current, I will. So the direct usages of the inverter are just those things. It also has an eco mode, which is great because otherwise an inverter is always draining power when it’s turned on. It took some tinkering to get the eco mode working so it would detect all my devices, but I think I have it working and otherwise have no complaints.
Then came another daunting problem. How to package it all? At this point I’ll mention, these days a popular solution is power stations…basically, an all in one pre-built box that includes a battery, inverter and charger all-in-one. I did look into these, especially at first, when I was overwhelmed with the research. However, to get a reasonable charging rate, it would likely still need some custom wiring…and they they always come in big cube shapes, which just didn’t seem easy to package away…and I wanted something that was completely out of sight, out of mind.
In the previous post, I mentioned the goose gear floor that the fridge slider and drawers are sitting on. One of the options for the floor is the “rear seat delete”. I got the 60 percent seat delete…which meant removing 2 seats worth of the rear bench. Then the flooring module continues the flat from the rear, leaving a storage area underneath. This works perfectly as I was already folding down that part of the seat anyway on camping trips. The one remaining seat is where I sit to remove/put-on my shoes when accessing the camper top above.
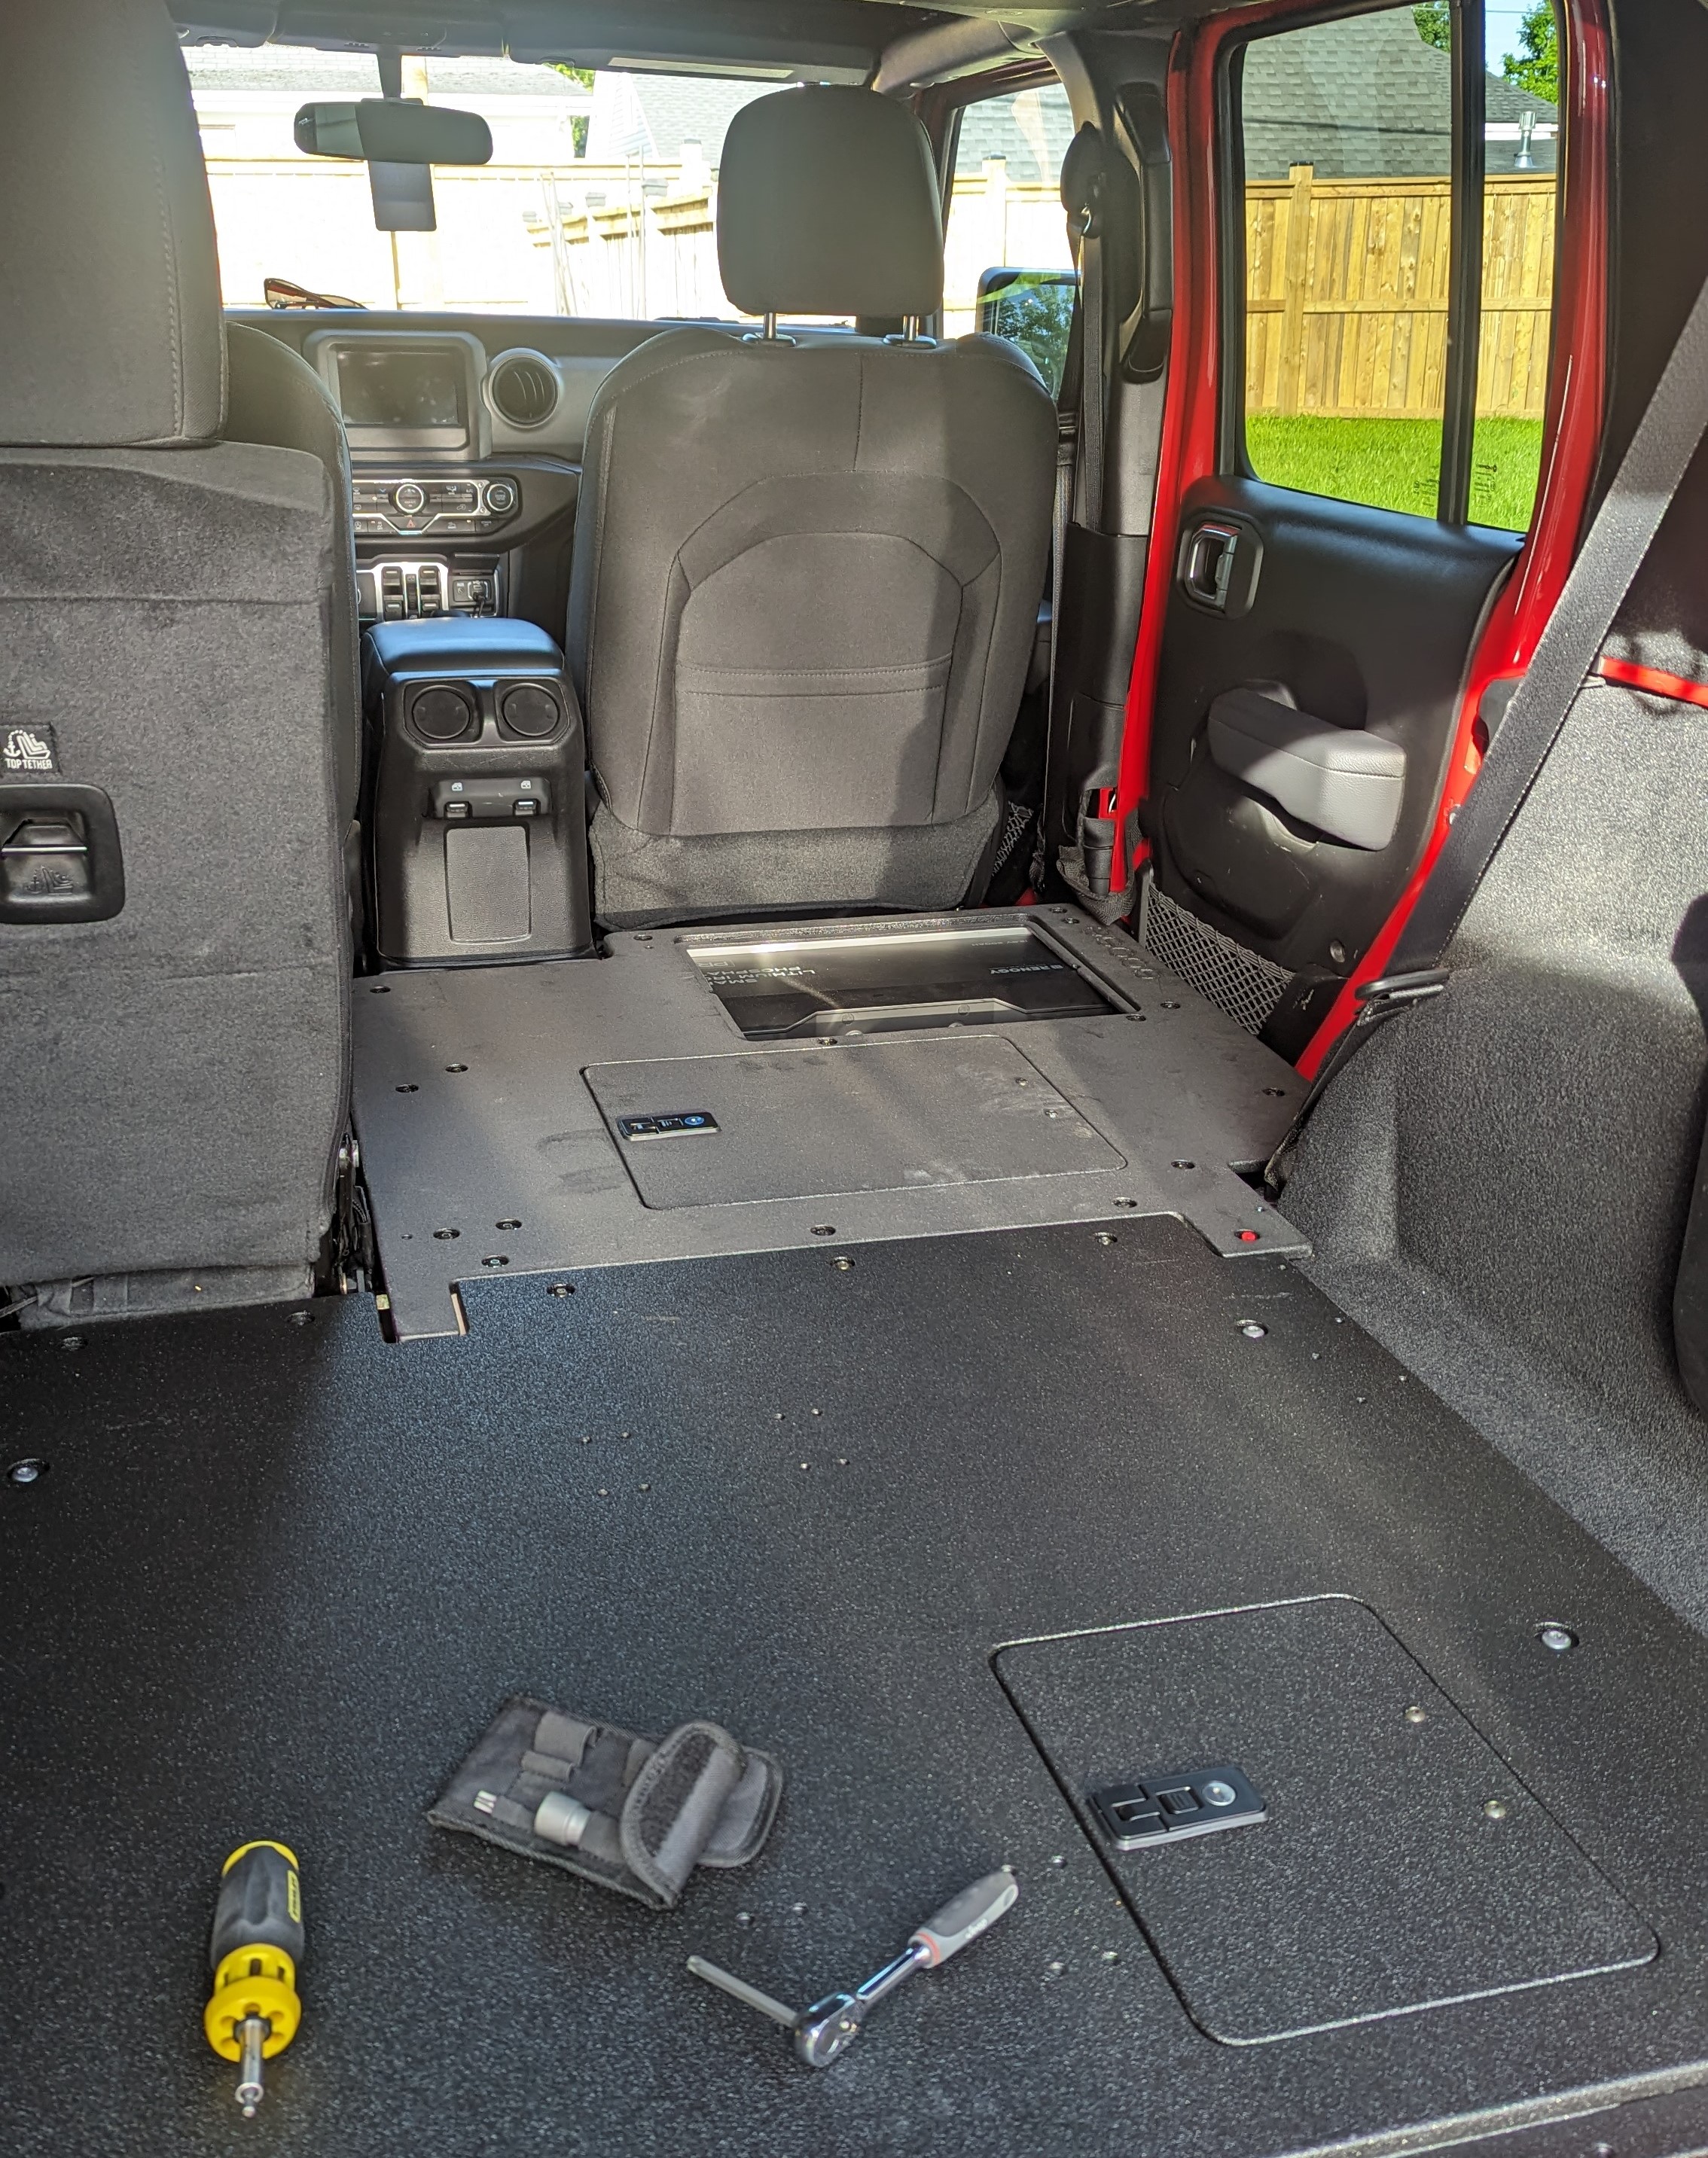
Early on, the plan developed to store the electrical stuff below that flooring…but it was hard to get exact measurements of the space, especially as I wanted to fit the battery there as well. So I put in my order for the goose gear stuff, and left it as a problem to solve once I had it. But then, I was in a small fender-bender, and the Jeep took longer than expected to get repaired…leaving me with just a few weeks to put everything together. At which point, I had my battery(a Renogy Smart Lithium Pro 200 ah), and discovered that it didn’t quite fit. I got some help from a friend to add some height to the supports…raising the flooring just a bit…and I had to cut some carpet to get more clearance. There isn’t anything directly securing the battery, but it more or less fits and can’t move anyway. It’s also on its side…which I’ve seen inconsistent reports as to whether that’s ok with this battery. I did watch some tear down videos, and the cells are already mounted horizontally, so I’m ok with it. Worst case, it doesn’t last as long and I have to scope out something else. While I went with the highly regarded(and expensive) Victron for other components, I was already seeing the battery as a more transient component…hence why it was the cheaper Renogy brand.


I was also waiting on my mechanic brother to help run the wires from the engine bay. By the time the battery was fitted and wires run, I had 1 weekend to actually implement the rest of the wiring. It was a crazy push, especially as I was still figuring out the exact layout of everything. In the end, a bunch of things are mounted to the middle divider/support, with some bus bars on the opposite side from the battery. For the most part it’s setup to be reasonably easy to remove without detaching many wires. There’s also a kill switch so I can disable everything when I’m not on the road.

The most satisfying moment was when I turned it on, started the Jeep, and had charging at 50 amps, along with all the outputs working as planned. First try! I had also been getting a little worried that I wouldn’t be able to package everything cleanly the way I wanted, but it all worked so incredibly well!

The beauty of it is: it’s stored below the flooring; out of sight, out of mind. The Victron components and the battery each have bluetooth interfaces, so I can monitor things on my phone. I haven’t had any issues with things getting too hot, and I’m guessing the temperature is generally lower down by the floor anyway. The sides are open, so air can move. I haven’t been in a heatwave in the desert yet though, but so far it’s been working in the Canadian wilderness.

The system has been through 3 separate week-long trips this summer, and generally functioned perfectly. I’ve learned a few lessons along the way.
– As mentioned, I did have to tinker with the eco settings of the inverter, but that is operating perfectly fine now.
– I had heard that using the standard 12 volt plug for the fridge could get loose over time…but the connection seemed solid when I first wired it up. By the third trip, it was getting loose, and did disconnect once. I’ll probably just wire it directly into the fuse block, since I keep the fridge in the Jeep all summer anyway…it doesn’t need to be quickly disconnectable.
– On the last day of my 3rd trip, I arrived at the campground to a low voltage warning from the battery. Turns out the charge meter in the smart battery is just based on amp hours in and out, which isn’t perfectly accurate…so there’s some drift in meter accuracy over time. That normally gets reset when the battery is fully charged, but I had been avoiding fully charging it because it seemed like the charger was still going when the meter was at 100%…which was because it hadn’t reached peak voltage yet…the true indicator of a full charge. The upside is, that gave me a good test of idling the Jeep for 20 min to get enough charge to last the night, then I fully charged the battery in a little under 5 hours of driving the next day, which is amazing.
– Both of those last issues meant that there were a couple times the fridge was disconnected for several hours…but it only got as warm as 8 degrees celsius, which seems quite reasonable.
So at this point, I’m done modifying the Jeep for the year, and I’m very satisfied with how it all turned out. The major items are all done, and camping with it is so amazing. Now to get away on some bigger trips with it!


You know I didn’t understand much of what you said. However your ability to sort this all out undoubtedly is the reason you are so successful at your day job!!